
During Writing
Auditory Accessibility: Adding Closed Captions to YouTube Videos
Kalani Pattison
Closed captions are a distinct form of text-based subtitles that directly reflect the spoken language of a video and can be toggled on or off, compared to open captions which are permanently on screen, or subtitles that can be in a translated language. Some people have distinct preferences, of course, but open captions can be a distraction, obscure part of a view, or inhibit communication for other viewers with attention difficulties, for instance.
Audio description or described video, can be useful for those who can’t see the video itself, but as far as I know, there is no easy way to add audio descriptions other than including an entirely separate audio track. You can usually avoid the need for audio descriptions by ensuring that you don’t leave any visual elements to “speak for themselves.” That is, as part of an audio script, in an educational or instructional video, always include a discussion of or description of relevant visuals displayed in your narration. If you include a graph or an image, discuss it.
Generally speaking, closed captions cannot be added to videos directly, but are linked via various file types, depending on the situation. For most media players, a video can be played and linked an .SRT file, if desired, though this can get complicated depending on the media player or operating system.
A much simpler method is to play videos through an online hosting system. It is quite easy to add closed captioning to YouTube, for instance, though other online video streaming services often work in analogous ways. (The file type most common to online players such as YouTube is WebVTT or .SBV for YouTube specifically.)
There are three methods for adding closed captions to YouTube. (Technically, you can also go through and add them manually, but this is labor-intensive and somewhat prohibitive).
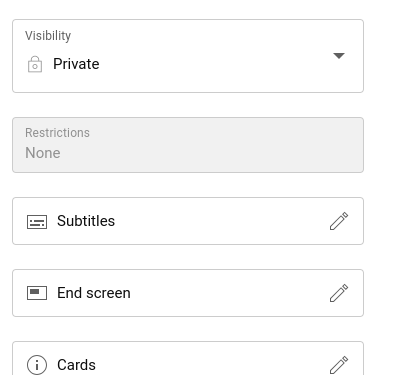
In all cases, start by opening YouTube Studio and proceeding to “Content” and the video where you which to add captions. On the right side of the screen on the Video Details page, choose the subtitles button on the right side of the screen towards the bottom.
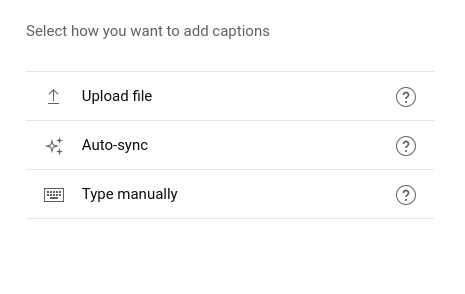
This will open the Subtitle Editor. If your video does not yet have subtitles, you will then see three options:
- to upload a file
- auto-sync, or
- type manually.
If you already have a caption file
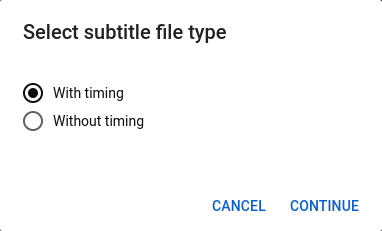
If you already have a subtitle vile in .SRT or .sbv or .WebVTT or .vtt, you should consider uploading it here, following these steps:
- Choose “Upload a file”
- A pop-up will ask “with timings” or “without timings”
- Choose “with timings”
- Upload the caption-related file.
If you have a Script
If you recorded sound by reading a script, this is the second best (and most common way) to add captions.
- Choose “auto-sync”
- Copy and paste the script into the provided textbox.
- Select “Done.”
- Patiently wait for the “auto sync” to determine the links between your timing and the speech in the video. This may take a few hours.
- Check back to the same page and subtitles in a few hours or the next day to see the timings generated.
- In the Caption editor, adjust the timings as necessary, to make sure there is not too much or too little text on the screen at once, and double-check that things are linked up properly.
If you don’t have a script or a caption file
This way requires a bit more patience and labor.
- After uploading, make sure you have the language (if in English) identified. Click on the “subtitles” on the left-hand panel and choose “Add language” to add “English (United States)”
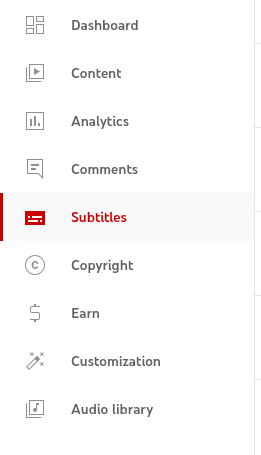
Fig. 16.5. When looking at the YouTube Studio page for a specific video, “Subtitles” can be found in the middle of the 9 options on the left panel. 
Fig. 16.6. When selecting “Subtitles” from the left panel, this is the “Video Subtitles” home page that appears. Hovering over the center option allows you to choose the pencil and therefore edit the subtitles connected to the video. - Then wait. You may need to wait awhile (even perhaps more than a day) for the algorithm to recognize the speech and transcribe it as close as it can.
- Check the video every so often, until the CC button on YouTube is white instead of gray, and it has English (Auto-generated) as an option for the captions.
- Proceed to the Subtitle Editor mentioned earlier, and make corrections. Break the speech into sentences with punctuation, add capitalization, fix places where the algorithm misunderstood, etc. Also check the timings, amount of text per screen, and lengths as you would need to with the auto-sync option.
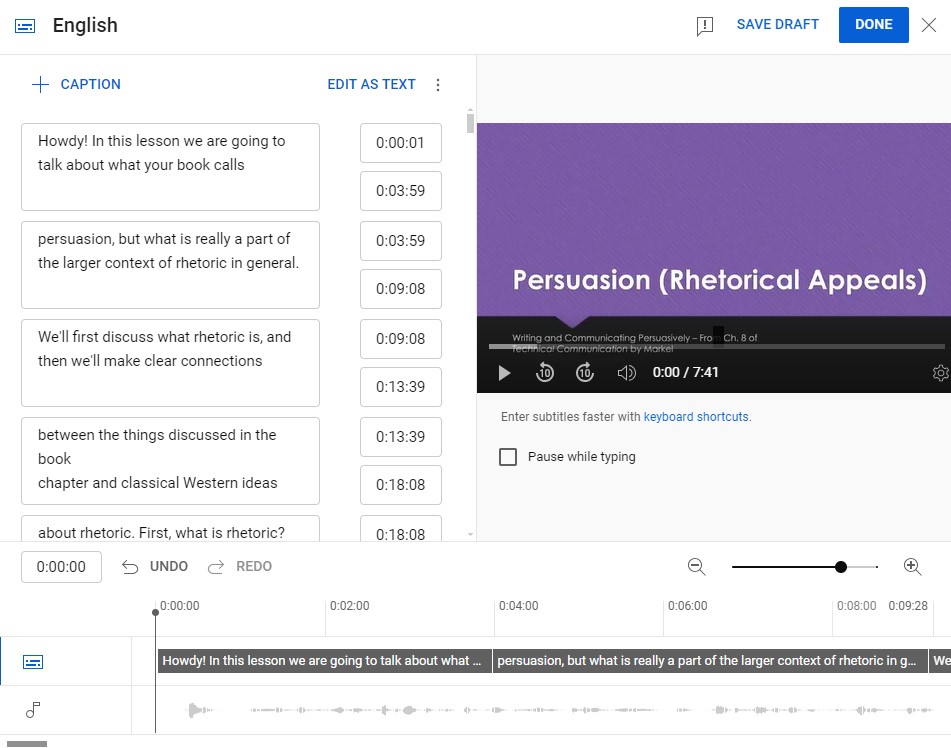
Fig. 16. The YouTube Studio Subtitle Editor, showing captions, timings, and controls.
Editing afterwards
No matter your method, you need to be sure to proofread your captions after you have finished them. Watch through the video and check on timings, capitalization, that not too many lines of text or too few words appear at one time, and that captions stay up long enough to read.
Generally, closed captions should convey all important information that has an impact for general audiences through sound — including sound effects or background music if applicable.
There are other types of captioning for those with visual impairments that describe actions and visuals and are used along with a script to help make television and other similar media styles accessible. Most videos do not have this type of captioning as an option.
For further instructions see “How to Add Captions while Uploading & Editing Your Videos,” by the YouTube Creators channel.
Media Attributions
- Screenshot of the Subtitle Editor feature of the Video Details page in Studio in YouTube Studio, June 4, 2024.
- Screenshot of the Select How You Want To Upload Captions feature in YouTube Studio, June 4, 2024.
- Screenshot of the Select Subtitle File Type feature in YouTube Studio, June 4, 2024.
- Screenshot of the Subtitle Editor with captions complete in YouTube Studio, June 4, 2024.
- Screenshot of the toolbar with Subtitles in Video Details in YouTube Studio, June 4, 2024.
- Screenshot of Choosing Edit From Subtitles Language List in YouTube Studio, June 4, 2024.
VTT Files are a type (one of the most popular types) of video subtitle fil that can be used for closed captioning. (It stands for Video Text Tracks format).
