
During Writing
Visual Accessibility: Using Styles
Gia Alexander; Heather Caprette; Amanda Coolidge; Sue Doner; Amanda Goodsett; Josie Gray; Sarah LeMire; Barbara Loomis; Stephanie Tate; and Emilie Zickel
Using chapters, headings, and sub-headings to organize a resource allows students to see how the main concepts are related. In addition, headings are one of the main ways that students using a screen reader navigate through a chapter. Screen reader users can press a keyboard combination, such as Insert + F6 to bring up a list of headings on a page and navigate out of context, to help find topics faster. They can also press the H key to jump to the next heading on a page. This is why it is important to apply heading and subheading styles to your text. Heading and subheading styles identify the headings programmatically to the screen reader application.
Creating a Hierarchical Structure
Headings help to identify the hierarchical structure of a document (e.g., sections, sub-sections). They provide a visual cue that helps sighted readers quickly navigate through sections of a document, skimming until they find the section they are looking for. Similarly, headings create logical divisions in the content and allow a non-sighted user to navigate a page or document easily using a screen reader.
Note:
All headings should be hierarchical, meaning that headings marked as Heading 3 need to be under a Heading 2, and a Heading 2 needs to be under a Heading 1. It is incorrect to skip from a Heading 1 to a Heading 3.
When it comes to using visual references to indicate the hierarchy and structure of a document, you might be accustomed to changing the font style, enlarging the type size, or highlighting the text with bold, underline or italics to create the impression of a heading. This approach presents problems when creating material with accessibility in mind because screen readers won’t identify the text as a heading. Instead, the screen reader will just “read” through the text of a heading as if it were regular content, missing your intended cues about structure and organization.
Special Considerations for Titles of Documents and Web Pages:
Some word processors include Title and Subtitle options in addition to standard headings. Unfortunately, title, subtitle, and Heading 1 styles can become confused when converting a document to an alternative format such as a web page (HTML) or an accessible PDF. To avoid this confusion, we recommend the following best practices:
- Avoid using Title and Subtitle headings. Instead, use Heading 1 for the document title.
- There should be only one Heading 1 on any given document or webpage.
Using Styles in Microsoft Word
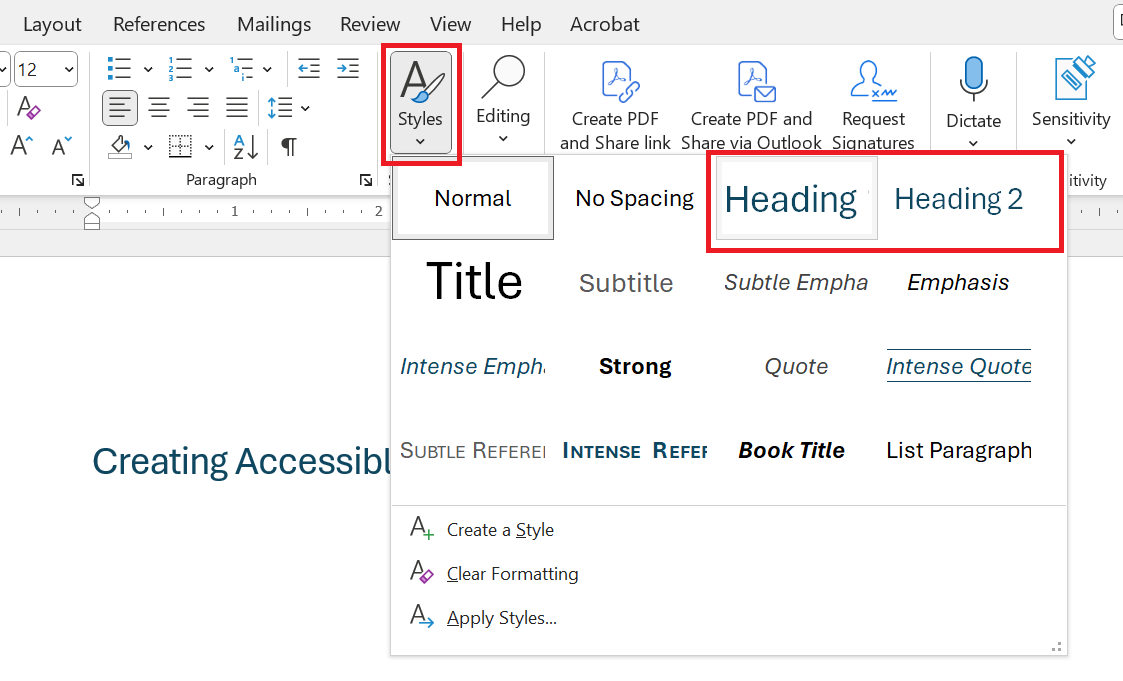
In Microsoft Word, the Styles heading is located under the Home tab. To mark a heading with the appropriate heading level, select the text and choose the appropriate heading. Although initially Microsoft Word has only Heading 1 and Heading 2 options available, as your hierarchy develops, additional options emerge. For example, after you mark a heading as a Heading 2, a new option for Heading 3 will appear in Word.
Adjusting Heading Look and Feel in Microsoft Word
Sometimes you’ll find that you don’t like the look and feel of a particular heading level. Maybe Heading 2 is too big, or perhaps you want Heading 3 to be italicized the way Heading 4 is. Caution! Don’t choose a different heading level because you prefer the way it looks. Instead, you can customize the appearance of any heading level.
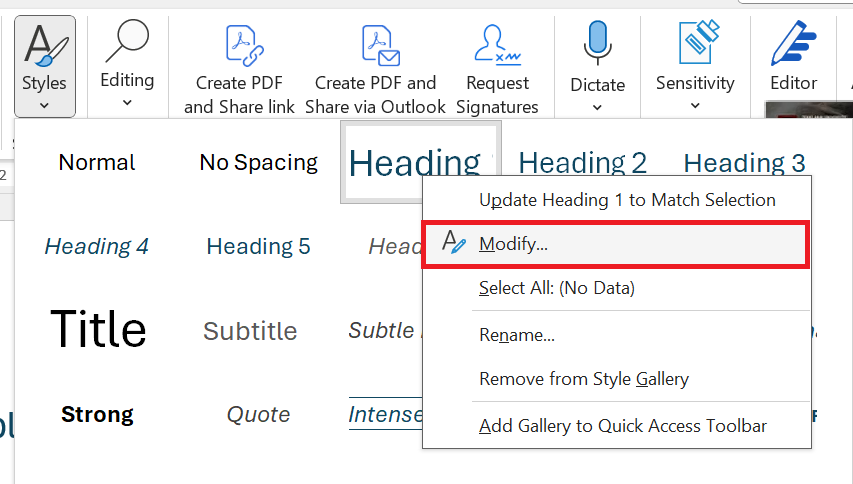
To do this, go to the Styles menu and right click on the heading level you want to change. Select Modify and then adjust the font, font size, bolding, etc. to match your particular preference. Once you save your selections, all of the headings marked with that heading level will automatically adjust to the new look and feel.
Using Styles in Google Docs
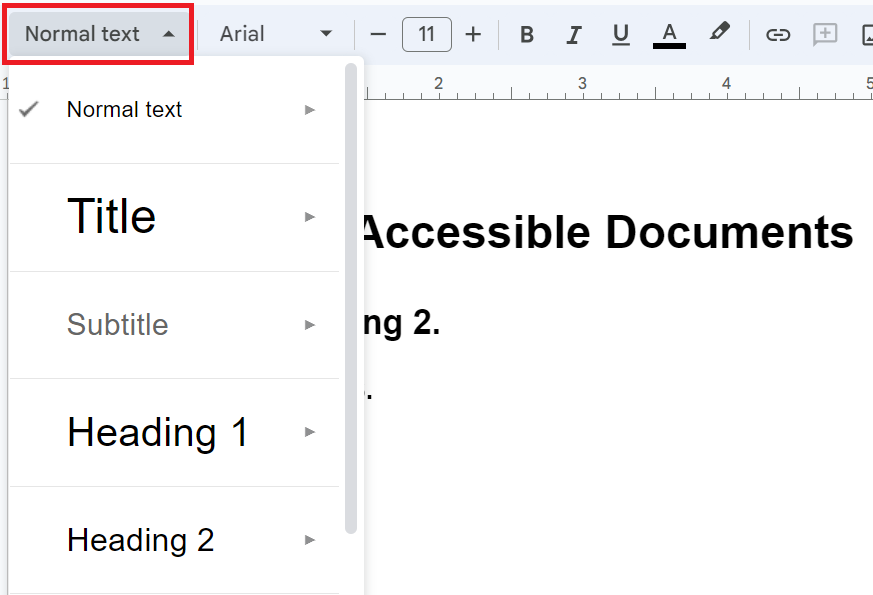
In Google Docs, the Styles menu is located right in the main toolbar. By default, the menu appears under the phrase “Normal text.” Google Docs includes Heading 1 through Heading 6, each preprogrammed with default formatting.
To mark your heading with the appropriate heading level, simply highlight your heading text and, under the appropriate heading listing, choose “Apply heading [number].”
Adjusting Heading Look and Feel in Google Docs
As you create your document, you may find that the look and feel of your heading(s) isn’t quite what you prefer. Fortunately, it is quick and easy to change this in Google Docs. To change the look and feel of your headings:
- Select one of the headings that you’d like to change. For example, if you want to change the look and feel of Heading 3, select one of your existing headings at that level.
- Change the look and feel of that heading. You may decide to change the font, make the text bigger or smaller, change the spacing, add bolding, etc.
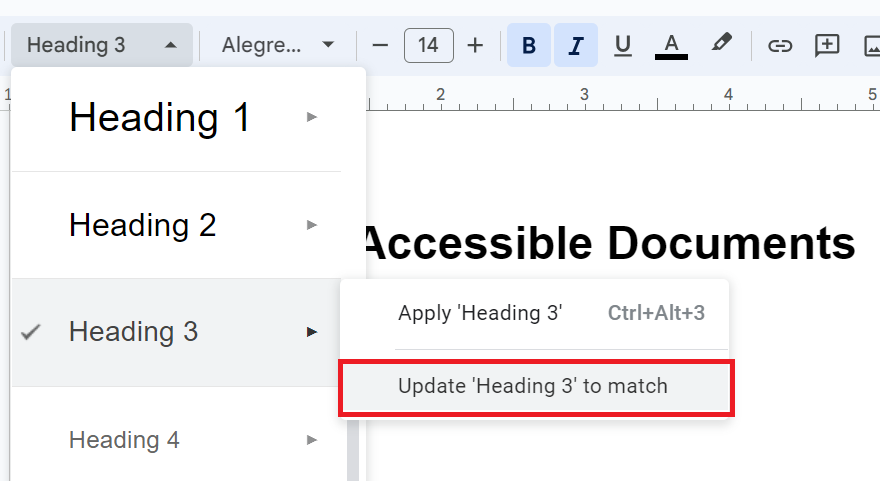
- Open up the Styles menu and, under the relevant heading level, choose Update heading [number] to match. All of your headings marked with that heading level should now match your customized heading format.
Using Styles in Pressbooks
In Pressbooks, use the visual editor to tag sections with Heading 1, sub-sections with Heading 2, sub-sections of sub-sections with Heading 3, and so on. HTML has six heading-level elements.

Customizing the look and feel of your headings in Pressbooks is not something you can accomplish using the WYSIWYG editor. Instead, you have a few options:
- To modify an individual heading, you can switch over to the Text editor and change the appearance of the heading using HTML.
- To change the look and feel of a heading across the entire Pressbooks book, you can go to the Appearance menu and choose Custom Styles. This feature allows you to use CSS to make style changes across the entire book.
- To change the overall look and feel of your book (including, but not only, headings), you can go to the Appearance menu and choose Themes. Changing the book to a different theme can be a quick and easy way to change the look and feel of your text.
This text was derived from
Loomis, Barbara, Heather Caprette, Stephanie Tate, Emilie Zickel, and Amanda Goodsett. Accessibility Toolkit for Authors of OER. Cleveland, OH: Pressbooks@MSL, 2023. https://pressbooks.ulib.csuohio.edu/accessibilitytoolkit/. Licensed under a Creative Commons Attribution-NonCommercial 4.0 International License.
Media Attributions
- Screenshot of the Styles feature of Microsoft Word 365, July 17, 2024.
- Screenshot of the Modify Styles feature of Microsoft Word 365 edition, July 24, 2024.
- Screenshot of the Styles feature of Google Docs, July 17, 2024.
- Screenshot of the Update Heading feature of Google Docs, July 17, 2024.
- Screenshot of the Headings feature of Pressbooks, July 24, 2024.
Assistive technology (primarily software) which converts text, images, etc. into alternative output such as speech or braille.
A style in Word, Google Docs, Pages, or similar is the collected details of formatting applied to text of a certain type or level, such as "body text" or "heading 2." Using styles allows a document to be quickly and consistently formatted, enables the ability to create a clear structure and generate a table of contents, and -- most importantly -- assists with the accessibility and navigation of documents.
