
3 Extraction of Caffeine from Tea Leaves
Introduction
Isolation of natural products has been a long-standing practice throughout history to extract specific parts of a mixture for later use, and has proven to be critical to the advancement of areas such as medicinal research. This has been specifically useful for isolation of the so-called active compounds in natural medicines.1 It’s likely that you are more familiar with natural product extraction than you may realize. Common examples of product extraction are the simply brewing tea or coffee. By adding water to the tea leaves or coffee grounds, compounds are taken out of the solids into the water to form solutions. In these examples, however, there is no further purification required. In a laboratory setting, scientists are often more interested in a specific compound within the broader extracted mixture. For example, a scientist employed by a fragrance company may be tasked with isolating the compound(s) responsible for the scent of a particular flower. The isolated compound may then be directly used in products or serve as a guide to synthesize the compound in the lab.
In this lab, you will be tasked with separating caffeine in a tea solution from the rest of the components in the mixture. This will be done over three main parts: first, you will extract the caffeine from a tea solution using ethyl acetate using a technique called liquid-phase extraction. Next, you will take the separated ethyl acetate solution and distill off the solvent, leaving behind the extracted caffeine. Finally, you will test the purity of your product using a technique called thin-layer chromatography. These are likely all new techniques to you, so take a deep breath and let’s work through the basics of these together.
Liquid-Phase Extraction
Extractions are a common laboratory technique that rely on differences in solubility of the compounds within a mixture, as well as miscibility of solvents. Extractions utilize a piece of glassware called a separatory funnel (Figure 1). This type of funnel is unique because the bottom has a stopcock to prevent liquid from immediately flowing out, and the top can be stoppered to allow the funnel to be shaken without spilling any liquid. To start, the solution of interest is added to the funnel with the stop cock closed. Then a new liquid is added to the funnel to extract the compound(s) of interest from the original solution. This new liquid may be a pure solvent (as is the case in this experiment) or it may be a different solution. With the stopper inserted and the stopcock in the closed position, the funnel can be shaken and inverted to cause the two solutions to mix. After mixing, you’ll notice that the mixture in the funnel separates back into two distinct layers and it may look identical to the starting mixture – the difference here is that the caffeine should have migrated from the aqueous layer to the organic layer. From here, the stopcock can be opened to allow the aqueous layer to drain out into a collection flask, followed by the organic layer into a separate collection flask.
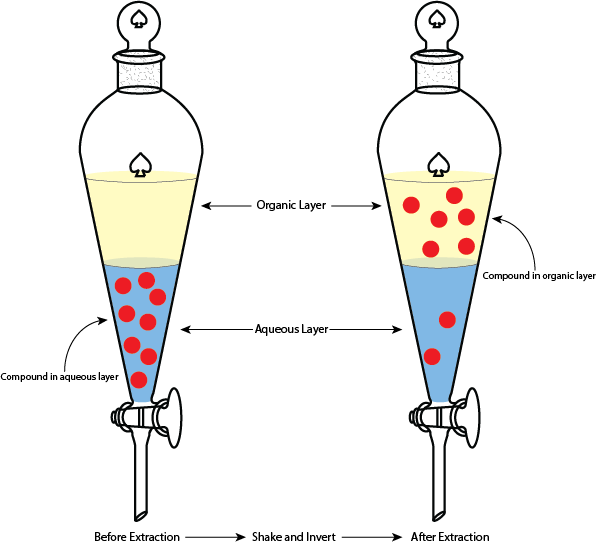
So why does this work? There are two critical aspects to consider here: compound solubility, and solvent miscibility. In this experiment, you are adding ethyl acetate to an aqueous solution. Ethyl acetate is an organic solvent and is immiscible with water, allowing two distinct layers to form. On top of that, caffeine is a polar organic molecule that is soluble in water, but is more soluble in a polar organic solvent such as ethyl acetate. So when you mix the two liquids in the separatory funnel, the caffeine will travel to the ethyl acetate layer. Once the liquids separate into the distinct layers again, you are able to isolate the organic (ethyl acetate) layer and move on to the distillation.
Still a bit confused? Feel free to click here to see another explanation with pictures.
Distillation
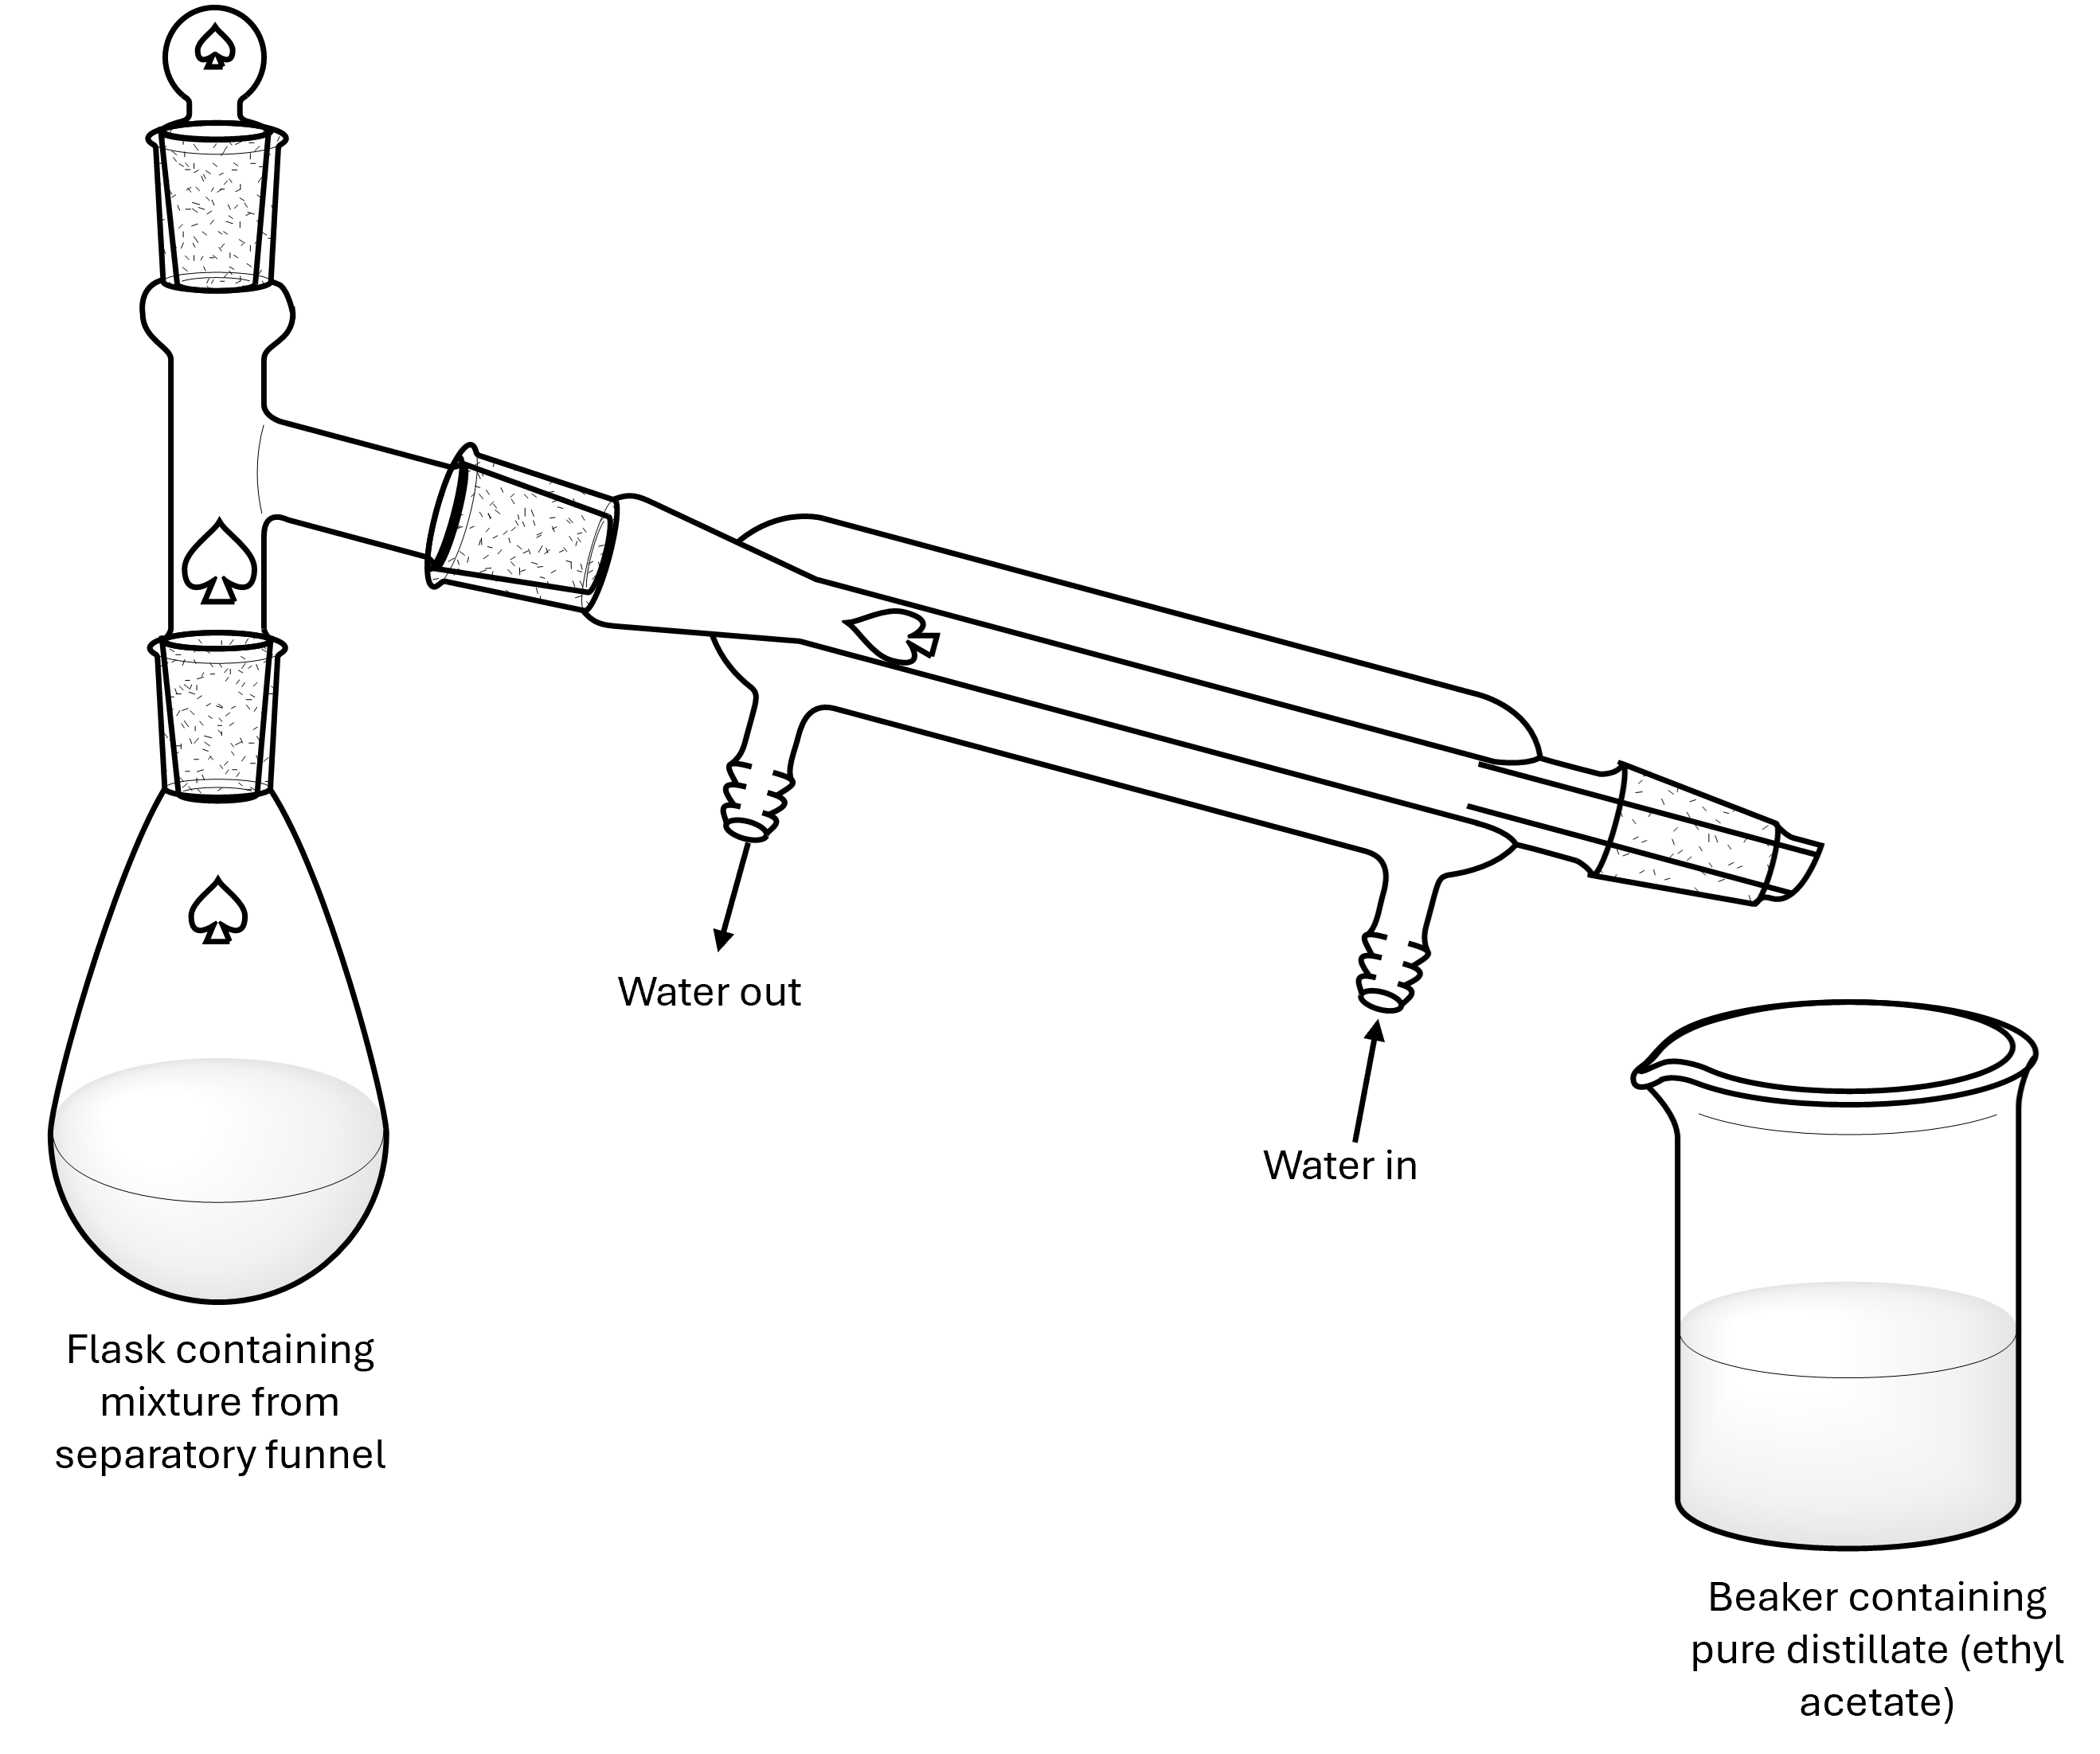
Distillations are a method for separating compounds in a mixture based on boiling points. When a mixture is heated, the component with the lowest boiling point will begin to vaporize and condense back into a liquid in the cooler receiving flask, leaving behind the component(s) with higher boiling points. This can continue until a pure compound remains in the distillation flask, or until the desired compound has been collected in the receiving flask.
Thin-Layer Chromatography (TLC)
Finally, TLC is a technique that is ubiquitous in chemistry labs, as it provides a quick and easy way to test the purity of an isolated compound. TLC consists of two “phases” – a stationary phase (the substance with which the TLC plate is coated, often silica or alumina, both of which are non-polar) and a mobile phase (the solvent system that is used to pull the compound(s) up the TLC plate). This method relies on differences in polarity to separate products from each other. Compounds within a mixture are separated from each other by the affinity each compound has for the stationary phase versus the mobile phase. To start, a small amount of the mixture is placed on the TLC plate (called “spotting“) along a line close to the bottom of the plate. Next to that spot, a solution of the pure compound of interest is placed. The spot of pure compound serves as a reference to see if your spot (the mixture) contains the only the product of interest or some mixture of products. Next, the TLC plate is placed in a beaker containing a thin layer of the solvent or solvent system you are using. The solvent must not be above the line that you spotted the TLC plate on! The solvent will then travel up the TLC plate through capillary action. The solvent will pull the compounds up the TLC plate, but the distance each compound travels depends on its polarity.
Tips and Tricks: Be sure to handle your TLC plate by the edges! Touching the face of the plate (i.e., the stationary phase) can alter the surface and cause compounds to not travel as well at that part. Additionally, always make sure that the solvent you are using (your mobile phase) does not come above the line on which you spotted your samples, as this will throw off your Rf values.
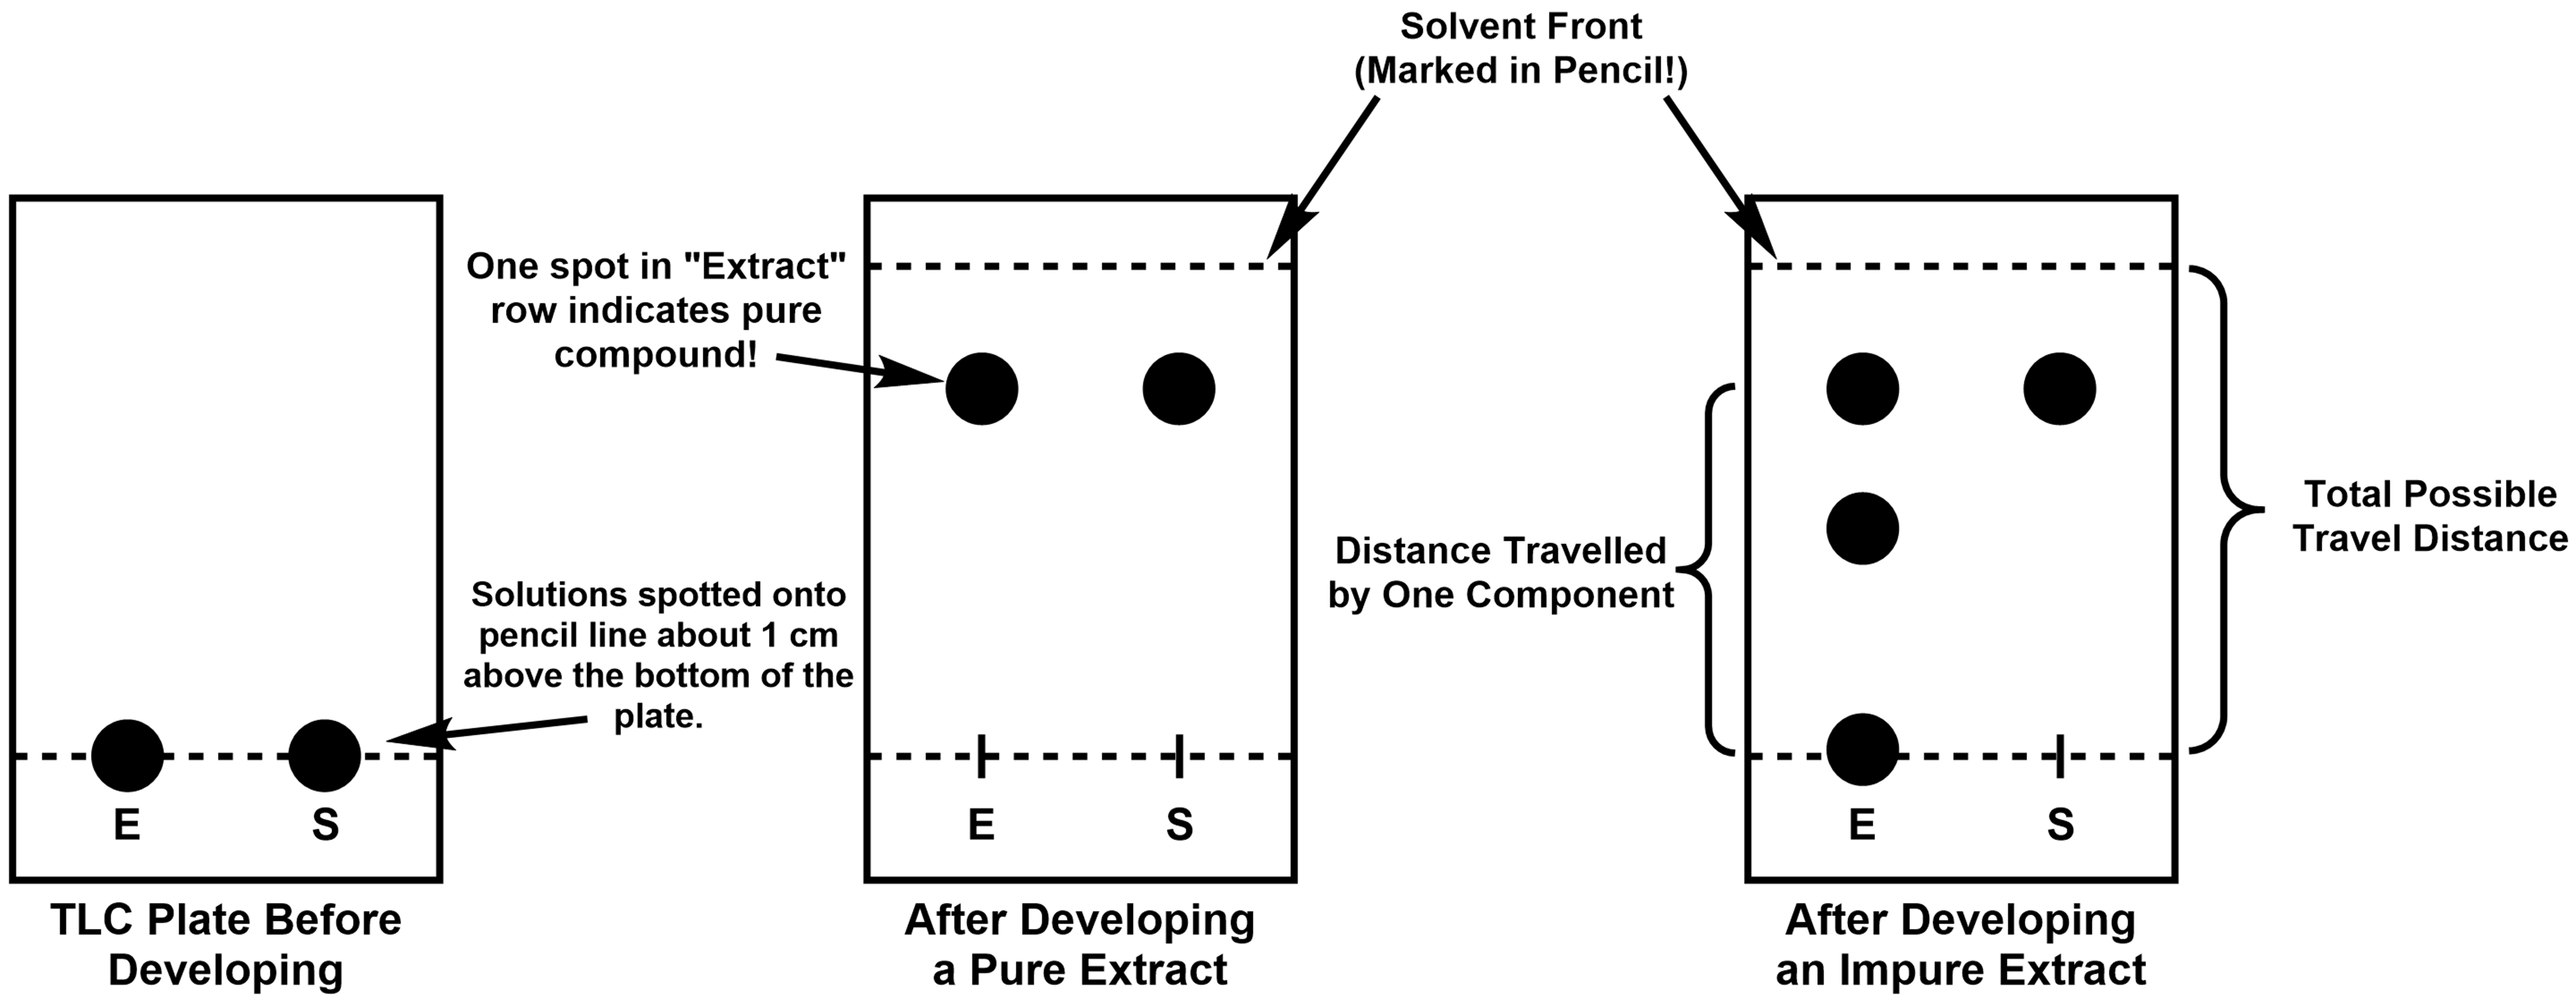
Let’s take a look at the three TLC plates in Figure 3. The plate on the left has had the extracted solution, labelled “E”, and the standard caffeine solution, labelled “S”, spotted onto the starting line. The starting line is drawn about 1 cm above the bottom of the plate so that the solvent (the mobile phase) doesn’t touch the spots except through capillary action. The plate in the middle is an example of a completed TLC experiment. The top line (also drawn in pencil) marks how far the solvent “climbed” up the plate. In this case, the “E” and “S” spots are the only two present, and they travelled an equal distance up the plate. The presence of only one spot in the “E” column suggests the extracted solution only contains one compound, and the equal travel distance to the “S” spot suggests that the pure compound is caffeine. Finally, the plate on the right is an example of a completed TLC experiment with an impure “E” spot. Each spot in the “E” column is a different compound — the differences is how far the compounds travel is directly related the each compound’s polarity. There are two important distances to measure on TLC plates; the distance travelled by each spot from the starting line, and the total distance a spot could have travelled (the distance between the starting line and the final solvent front). Taking the ratio of the travel distance for a particular spot to the total distance travelled (i.e., spot distance/total distance), an Rf value can be calculated for each spot.
It’s important to note here that the spots on your TLC plates will not be large black spots like they are in Figure 3. In reality, after the solvent dries (either when you’re spotting the plate or after the plate has been developed) the plate will likely still look plain white. No need for concern, this is normal! Lots of organic compounds have the (sometimes frustrating) trait of being colorless to very light yellow, so they can be hard or even impossible to see with the naked eye. There are numerous methods to visualize compounds on a TLC plate depending on the structure and functional groups present in the compounds. Since caffeine is an aromatic compound, the π-electron system will readily absorb the UV light while the actual stationary phase of the plate will glow, resulting in dark spots on the plate that correspond to the compounds. You can then outline the dark spots in pencil so that you can have a record of how far the compounds travelled after you take the plate out of the UV light.
Important Takeaways Regarding TLC:
- Always mark a TLC plate using pencil, NEVER USE INK!
- Avoid touching the white surface of the TLC plate.
- Spot a small amount of a solution onto the TLC plate and let the solvent evaporate. Then place another spot of the same solution on top of the first one. Letting the solvent evaporate between spotting allows you to increase the product concentration while preventing the spot from spreading too far.
- The solvent used for developing the TLC plate should never be above the line you spotted your compounds on.
- After pulling the TLC plate out of the chamber, quickly mark how far the solvent moved IN PENCIL.
- Visualize the TLC plate using the UV lamp and circle the spots that appear IN PENCIL.
Experiment Overview
Safety and Waste Disposal
Chemical splash goggles and nitrile gloves should be worn at all times throughout this experiment, as well as proper PPE (closed-toe shoes, long pants, and a shirt that completely covers your shoulders). Should any chemicals come into contact with your skin during lab, alert your TA immediately and rinse the affected area under running water for at least 15 minutes.
In this lab, you will be using a variety of techniques and chemicals that you may not be familiar with. The organic solvent in this experiment is ethyl acetate, so care should be taken to avoid breathing in the fumes (click here to see SDS). Additionally, you will be working with a concentrated solution of caffeine in water. Remember that the caffeine solution is clear and colorless, so it may be difficult to differentiate the caffeine solution from something like pure water. Caffeine is absorbed through the skin (click here to see SDS), so it is especially important to immediately wash off any that comes into contact with your skin. Lastly, remember that organic solvents like ethyl acetate are especially volatile at room temperature, so do your best to avoid breathing in any solvent fumes. If you start to feel light headed at any point during the experiment, immediately alert your TA and step out into the hall to get fresh air. Once you are feeling a bit better, you can return to the lab or work with your TA on scheduling a make-up experiment.
A distillation, while not overly complicated, is a new technique that can be a bit daunting at first. It is important to carefully handle the glassware during assembly and takedown to ensure that nothing breaks. While we understand that accidents do happen, broken glass is always a hazard and especially while it’s hot! You are always welcome to ask your TA about your setup before you get started just to make sure that everything looks the way it should.
All liquid waste generated in this experiment should be discarded in the designated inorganic waste bottle in the fume hood. The cotton plug and Na2SO4 used during the extraction portion of the experiment should be discarded in the solid waste container in the fume hood. The separatory funnel can be cleaned by rinsing with deionized (DI) water. The distillation setup (specifically the three-way adaptor and condenser) should be left set up on your bench and do not need to be cleaned.
Experimental Procedure
Before beginning, place a 400 mL beaker filled about two-thirds full of water on a hot plate and being heating. Do not let the water boil. This hot water bath will be used in the distillation portion of the experiment (Part 2).
Part 1: Extraction of Caffeine with Ethyl Acetate
First, you will need to set up a ring stand that can hold the separatory funnel. Gather two of the circular clamps from the equipment bench and attach them to the ring stand such that the bottom of the separatory funnel will drain directly into a standard funnel (Figure 3). Next, you should prepare the standard filter as shown in figure 3 by stuffing a piece of cotton into the funnel and then layer about 6 g of sodium sulfate (Na2SO4) on top of the cotton. With this part of the setup out of the way, we can begin our actual extraction.
Measure out about 20 mL of the tea solution from the fume hood and pour it directly into the separatory funnel (make sure the stopcock is closed so you don’t accidentally spill the tea!) Next, measure out about 10 mL of the ethyl acetate from the fume hood and add it to the tea solution in the separatory funnel and insert a stopper into the top of the funnel. You may notice that layers are immediately formed, so we need to get these layers to mix by agitating the separatory funnel in a slow rowing motion. As the layers mix pressure will build up in the funnel, so you should carefully invert the funnel in the fume hood and open the stopcock to allow built-up gases to vent (also called “burping” the funnel). You can expect to hear a slight hissing noise as you open the stopcock and the pressure is released. Once you are sure the caffeine has been extracted, you can put the separatory funnel in the topmost ring on your ring stand as outlined in Figure 3. You will need to give the mixture a little bit of time to fully separate. While you wait, you can get the empty mass of your conical flask that you will use to collect the organic layer.
Tips and Tricks: Be careful not to shake the separatory funnel to mix the solutions! This could end up forming an emulsion-like mixture, which will be very hard if not impossible to effectively separate. Along with the rowing motion, you may also repeatedly (and gently!) invert the separatory funnel. If you choose to do this, however, just be careful that you don’t accidentally create an emulsion.
When the liquids have fully separated in the separatory funnel, you should collect the aqueous layer in a fresh, clean beaker. Do your best here to get as much of the aqueous layer out as possible, while also preventing the organic layer from coming out as well. It’s okay if some of the organic layer comes out with the aqueous layer, but your overall yield of caffeine will be slightly off (you should think about how the yield will be affected if you lose some of your organic layer with your aqueous layer!) With the aqueous layer gone, you should set up the separatory funnel, filter funnel, and pre-weighed conical flask as shown in Figure 3. Now the organic (ethyl acetate) layer can be carefully drained into the filter funnel, which will drain directly into the conical flask.
Tips and Tricks: Let’s take a second to dissect the previous paragraph. In the first step, you are told to simply drain the aqueous layer into a clean beaker. The aqueous layer does not pass through the funnel containing the Na2SO4 and cotton plug. Na2SO4 is soluble in water, so passing the aqueous layer through the filter funnel would cause most (if not all) of the Na2SO4 to dissolve. So why bother passing the ethyl acetate layer through the filter funnel? Since the ethyl acetate layer will only have a very small amount of water left, the Na2SO4 will actually pull out whatever water remains in the layer. So in this case, we are using the Na2SO4 as a drying agent. Remember that it is always better to have some of the organic layer come out with the aqueous layer during separation than to have a large amount of water remaining in your organic layer.
Now that you have your separated organic and aqueous layers, you should add the aqueous layer back into the separatory funnel and redo the extraction two more times. Notice in Figure 1 that after the extraction there are still some solute particles in the aqueous layer. Doing the extraction a total of three times ensures that you are getting as much of the caffeine out of the aqueous layer as possible.
Part 2: Distillation
Part of the distillation glassware should already be set up for you at your bench. Specifically, the three-way adapter should be secured to the condenser column with a yellow Keck clamp and the water should be flowing through the outer sleeve of the condenser. Add a small stir bar to the conical flask containing you ethyl acetate solution, attach the conical flask to the three-way adapter as outlined in Figure 2, and secure the connection with another yellow Keck clamp. Finally, place a clean 250 mL beaker under the collection side of the condenser to collect the distilled ethyl acetate. Turn on the stir plate and lower the conical flask into the hot water bath you previously prepared to begin the distillation. As the ethyl acetate is heated up, it will begin collecting in the 250 mL beaker as pure ethyl acetate.
Tips and Tricks: Adding a stir bar to the conical flask may seem odd since no reaction is occurring. However, without the stir bar, the risk of the solution bumping as it is heated increases, which would cause a reduced yield of caffeine after the distillation.
Be sure to monitor the mixture in the conical flask: DO NOT distill all the way to dryness! When there is only a small amount of ethyl acetate left in the conical flask, gently remove it from the hot water bath. Carefully place the conical flask in a fume hood to allow the rest of the ethyl acetate to evaporate away. While you are waiting, use this time to clean up. The remaining tea solution and the distilled ethyl acetate can be disposed of in the inorganic waste bottle in the fume hood, and all Na2SO4 and cotton plugs should go in the solid waste jug in the fume hood.
Once the ethyl acetate has completely evaporated, you should notice that there is a bunch of white solid left behind in the conical flask. This solid is your extracted caffeine! Collect the mass of the cooled conical flask containing the caffeine. Subtracting the mass of the empty conical flask from this mass will leave you with the mass of isolated caffeine.
Part 3: Checking the Purity of the Extracted Caffeine by Thin-Layer Chromatography (TLC)
Isolating pure compounds is critical in nearly every chemistry lab setting, so we need to check to make sure the caffeine you extracted is not contaminated with other compounds. To do this, we will be using thin-layer chromatography (TLC). Get a TLC plate from the materials bench making sure to handle the plate by the sides only. Make a line on one end of the plate about 1 cm from the edge using a pencil. Be very gentle so that you don’t accidentally scratch the silica surface! On this line, gently mark two spots (again in pencil) and label one dot “Extract” and the other as “Standard” (you can label these however you like, just make sure you remember which spot is which).
Add just enough ethyl acetate to your isolated caffeine to get the caffeine to dissolve. You don’t want to add too much ethyl acetate as that will make reading the TLC plate later more challenging. Place one end of a capillary tube in the caffeine solution. You should notice that the solution “climbs” into the capillary tube (think of capillary action). Gently touch the filled capillary tube to the spot on the TLC plate labeled “Extract”. Here you’ll notice that the solution quickly spreads into a circular spot on the TLC plate. Lift the tube off the plate so that the spot doesn’t get too big (the whole spot should only be about 0.5 – 1 cm wide) and let the spot dry. If there is still solution in the capillary tube, you can repeat the spotting process on the same spot after the solvent has dried. Using a new capillary tube, repeat the spotting procedure for the caffeine standard solution. Be sure that you spot the standard onto the spot labeled “Standard” and that the spots do not overlap!
Tips and Tricks: Be careful when you are spotting your TLC plate; you want your spots to be well isolated from each other, while also not touching the edge of the plate. This is easier to do by quickly touching the capillary tube to the plate and immediately lifting the tube away. Once the spot dries, you can repeat the tapping procedure until there’s no more solution in the tube. However, you have to be careful to not scratch the silica layer off the plate, as this will affect your reading!
Obtain a 250 mL beaker and prop your TLC plate up in the beaker so that the line on which you spotted your compounds is at the bottom. Add a small amount of the developing solvent (3:1 mixture of ethyl acetate:methanol. This mixture is also located in the fume hood) to the beaker. The solvent level MUST stay below the pencil line you’ve drawn on the plate! Cover the beaker with a piece of plastic wrap and secure it in place with a rubber band.
Immediately, you will be able to see the solvent “climb” up the TLC plate. This occurs through capillary action as mentioned above. Leave the beaker alone until the solvent has climbed within 2-3 cm of the top of the plate. Take the TLC plate out of the beaker and quickly trace where the solvent line is at the top of the plate. Be sure to do this part quickly, as the solvent mixture will immediately begin to evaporate! This final line serves as a reference for calculating your Rf values. Set your developed TLC plate on a paper towel in the fume hood to allow the solvent to completely evaporate off.
At this point, your TLC plate should look just like it did before you started, the only difference being the addition of the line marking the solvent front. In order to see how far the compound(s) in your extract travelled, you need to shine UV light on the plate. Once it is completely dry, take your TLC plate over to the UV lamp that is set up on the materials bench. Place the TLC plate under the lamp and turn the lamp on. You should be able to see distinct spots glowing on the TLC plate — that’s your product! Gently outline every spot you see in pencil, then turn the UV lamp off and return to your workbench.
If your extract is pure, there should only be one spot. Multiple spots in your extraction row suggests that the extract was not completely pure. You should be able to see this in the “Standard” row of the plate, as there will only be one spot that corresponds to the caffeine. Measure the distance (in cm) between the two lines on your TLC plate, as well as the distance from the bottom line to each of the spots on the plate. These distances allow you to calculate Rf values for each of your spots.
When you have recorded each distance, you may discard of the TLC plate in the solid waste jug in the fume hood. Any capillary tubes used during the TLC spotting can be discarded in the “Broken Glass Waste” boxes located by each door in the lab.
References
(1) Zhang, Q.-W., Lin, L.-G., Ye, W.-C. Techniques for extraction and isolation of natural products: a comprehensive review. Chin. Med., 2018, 13, 20.
This purification technique typically involves two solvents that do not mix with each other. The added solvent is chosen so that the compound(s) of interest are pulled from the mixture into the new solvent. Since the solvents don't mix, they can be easily separated, allowing for the compound(s) to be readily separated from the total mixture.
Miscibility refers to how well liquids mix together. If the liquids combine to form what appears to be one phase, the liquids are miscible. If two distinct layers are formed, the liquids are immiscible. A classic example of immiscible liquids is oil and water.
Spotting a TLC plate involves taking up a small amount of a solution into a capillary tube and gently tapping the tube on the TLC plate, creating a circular spot. As the spot dries, the compounds in the solution remain adhered to the TLC plate.
A cheap, water-soluble salt that is used to extract trace amounts of water from organic solvents by incorporating the water into its own solid lattice structure. Common examples are sodium sulfate, magnesium sulfate, calcium sulfate, and calcium chloride.
If a solution is heated unevenly during a distillation, local hot spots could form in the solution, which can expand rapidly as any formed gases escape the solution. Visually, it may appear like the solution randomly popped, causing the solution to splash.