
2 The Molar Volume of a Gas
Introduction
Of the three main states of matter (solid, liquid and gas), only a gas is described as having no inherent volume or shape. Instead, gases adopt the volume and shape of the container that holds the gas. On top of this, gases are compressible. This means that a container that is full of a gas can have its volume lowered without removing any of the gas (think of squishing a blown-up balloon in your hands). These characteristics have led to numerous experiments and observations regarding the relationship between physical attributes of a gas-filled system.
There are three main laws that relate to the characteristics of a gaseous system, each of which describes how the volume of a closed system will be affected by changing the Pressure, Temperature, or moles of the gas. These are Boyle’s Law, Charles’s Law, and Avogadro’s Law, respectively.
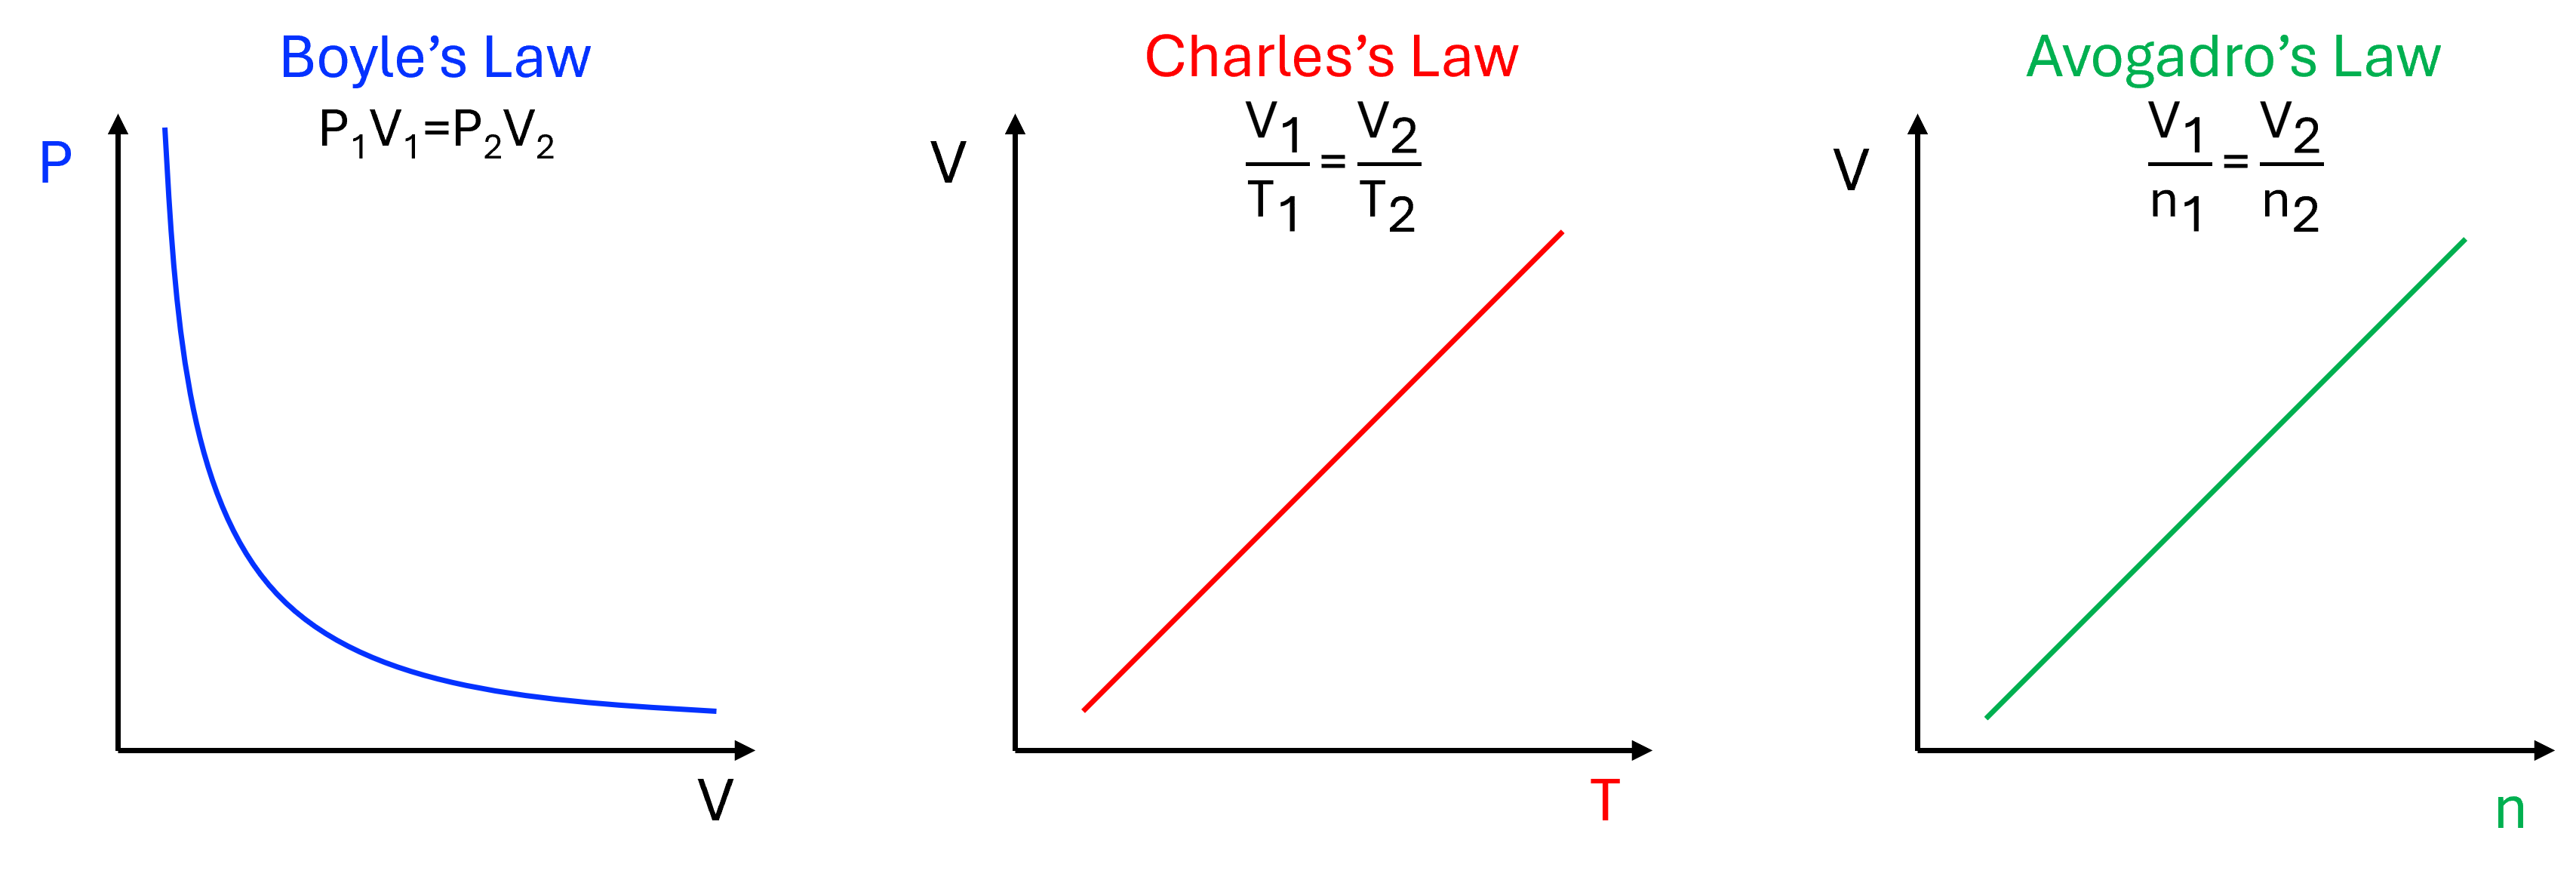
While these relations may seem fairly simple on their own, combining the gas laws into a universally-understood law can be a bit challenging.1 To work around this, we will only consider the ideal gas law in its derived form (equation 1).
| PV = nRT | (1) |
Tips and Tricks: In equation (1), R is called the universal gas constant, and can take on many values. The choice of which R value to use comes down to the units that you’re working with. For example, R = 0.08206 (atm L)/(mol K) is commonly used with the ideal gas equation because it explicitly contains the pressure (atm) and volume (L) units. However, you may also need to use the value R = 8.314 J/(mol K). Using the incorrect value of R will greatly skew your results, so make sure to pay attention and use the correct value!
Specifically, Avogadro hypothesized that equal volumes of different ideal gases at the same temperature and pressure will have an equal amount of molecules. Through numerous experiments, it was determined that, at standard temperature and pressure (STP, 0°C and 1 atm), one mole of an ideal gas takes up 22.41 L of space. This is considered the molar volume, and is written as 22.41 L/mol.
In this experiment, you will be tasked with determining that the value for molar volume at STP is indeed 22.41 L/mol. To do this, you will be studying the reaction between magnesium strips and hydrochloric acid (equation 2).
| Mg(s) + 2HCl(aq) → MgCl2(aq) + H2(g) | (2) |
Hydrochloric acid is a strong acid that dissociates completely upon dissolving in water. The magnesium strip then reacts with the free protons by donating two electrons to form the Mg2+ ion and H2 gas. The H2 gas forms bubbles in the solution before escaping into the atmosphere above the solution.
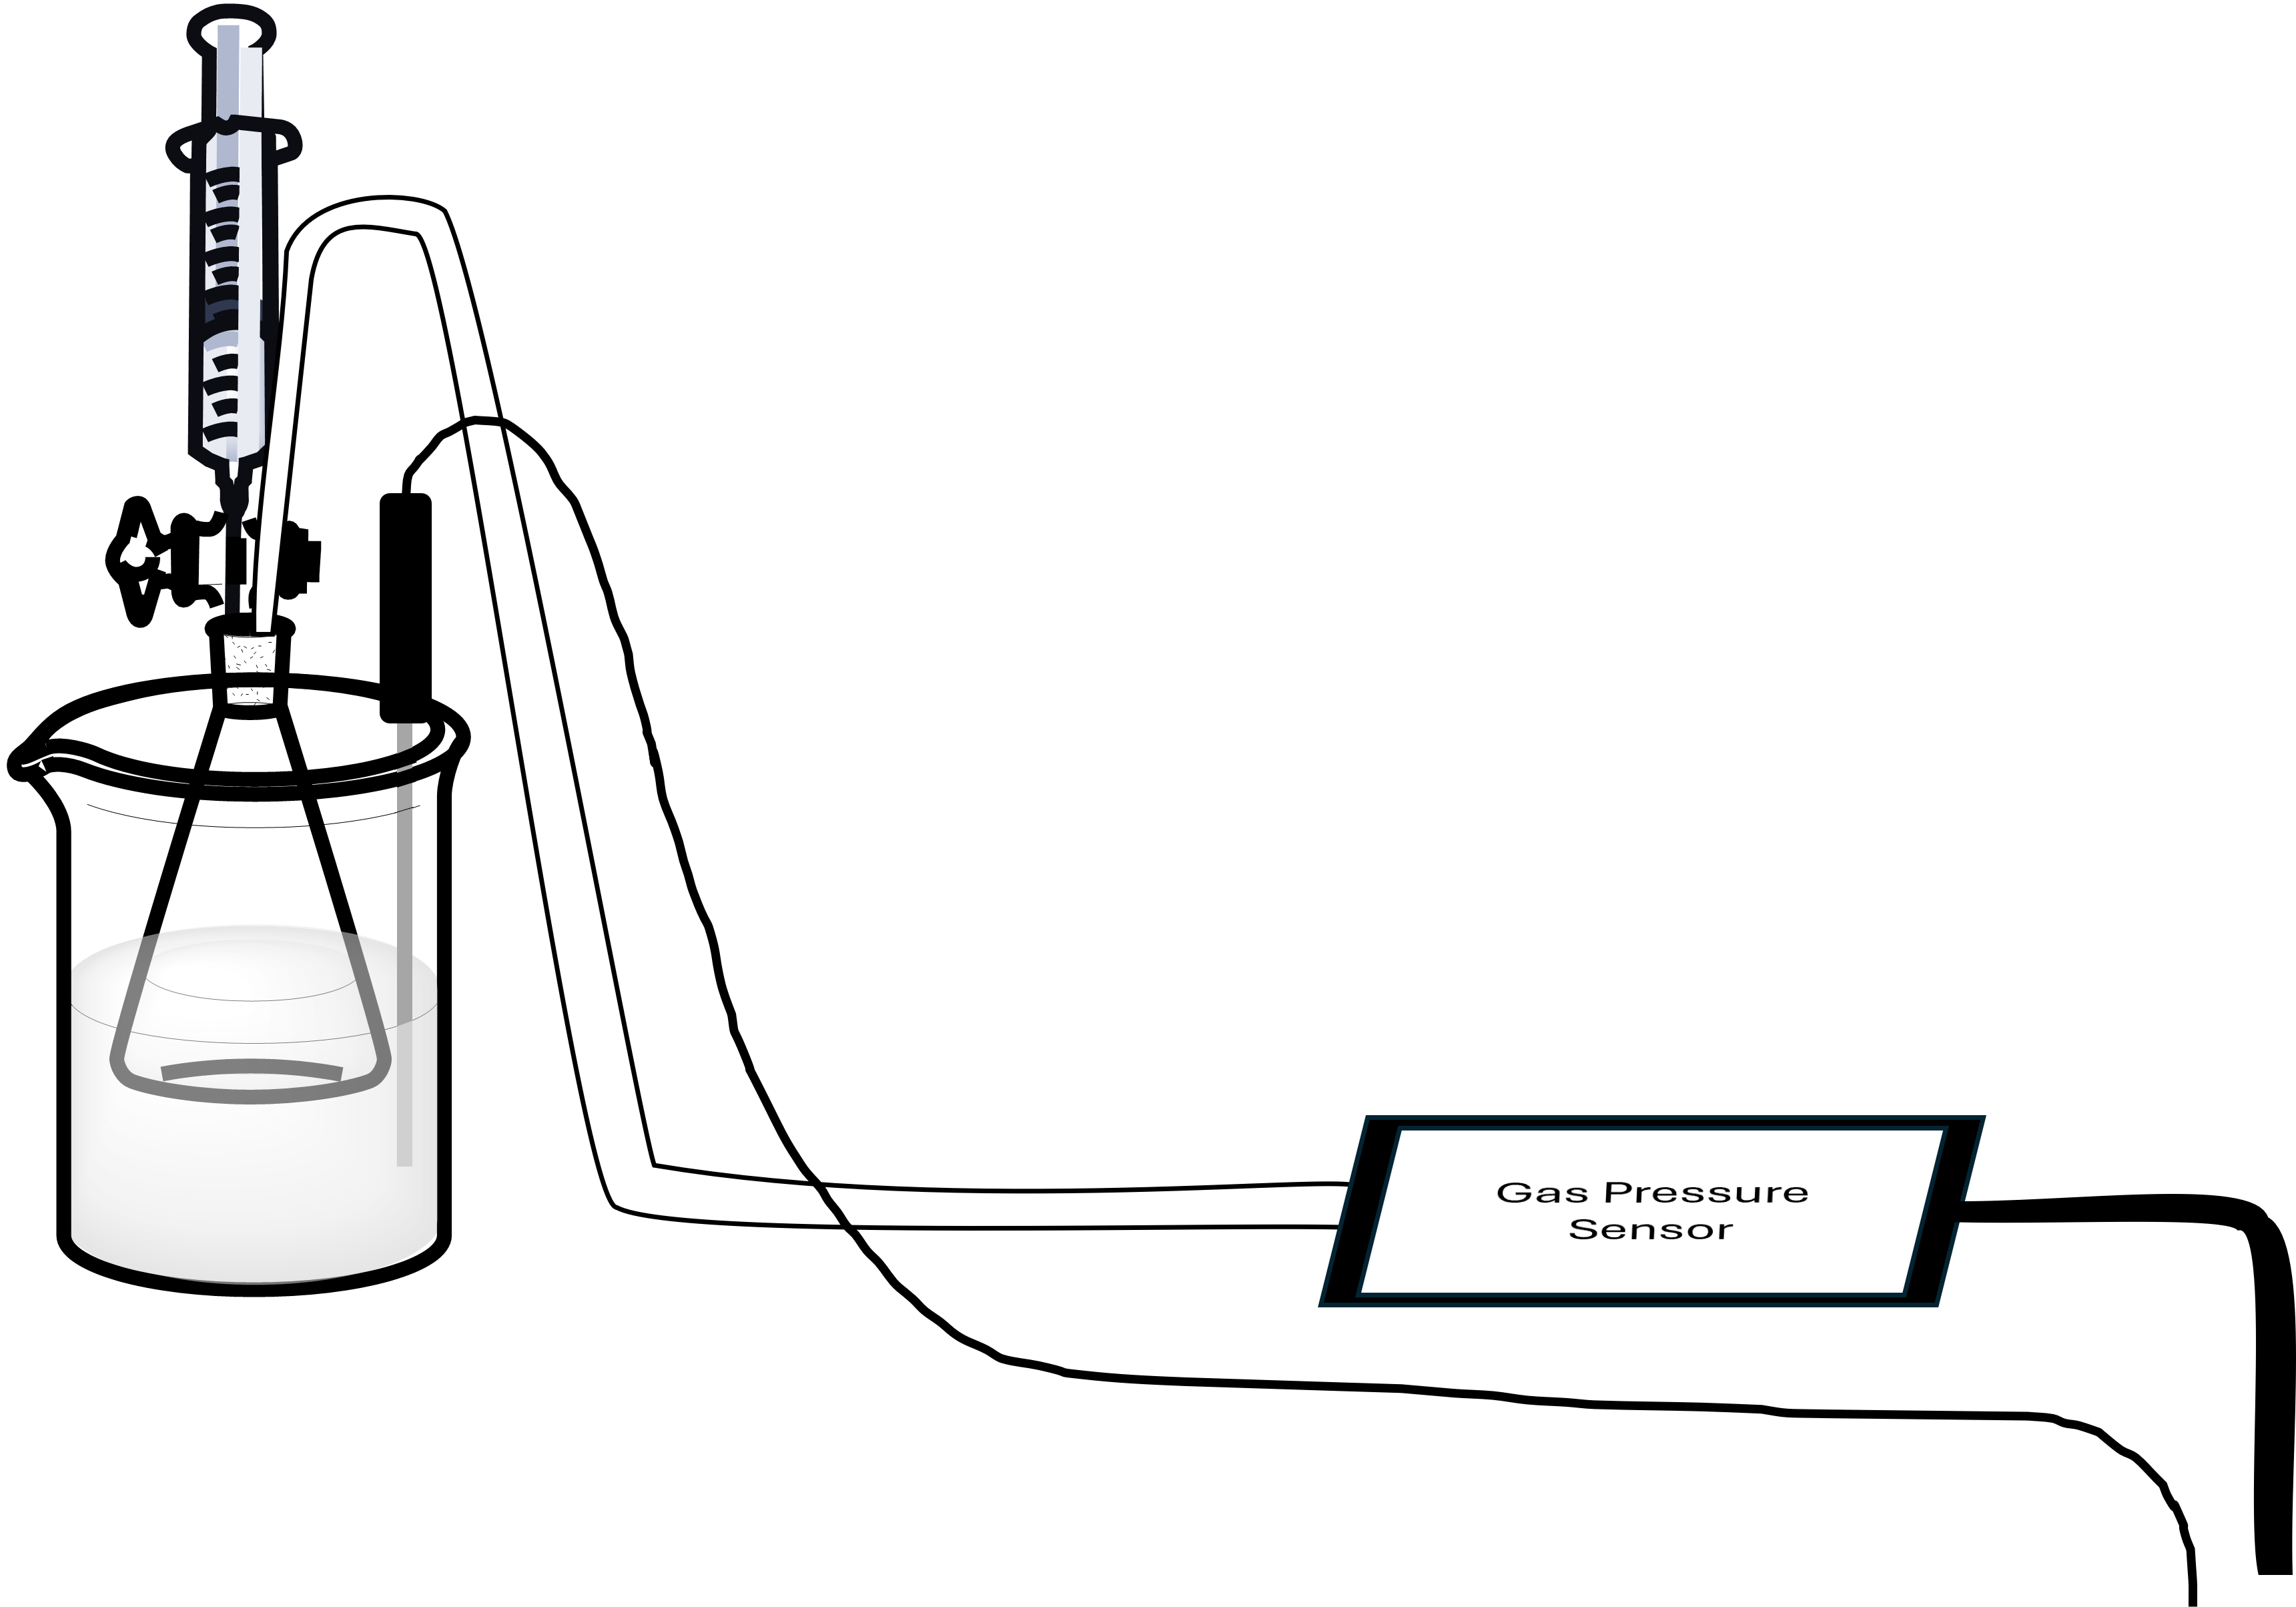
Take note of the experimental setup in Figure 2. The inner flask is where the reaction of interest is occurring, while the beaker of water serves as an insulator to keep the system at a constant temperature. The flask is sealed with a stopper, and a syringe with a stopcock is connected to one of the holes in the stopper, while a gas pressure sensor is connected to the other. The syringe allows us to add the acid to the flask, and the pressure sensor allows us to detect changes in the pressure within the flask as the H2 gas is formed.
Once you confirm the value for molar volume at STP, you will be tasked with identifying an unknown metal sample using the same experimental setup. By monitoring the pressure change in the flask and applying that to the ideal gas law, you will be able to determine the amount of metal (in moles) in the flask. From there, you can easily determine the molar mass of the unknown metal!
Experiment Overview
In the first part of this experiment, you will be tasked with determining the value for the molar volume of an ideal gas at STP. The Erlenmeyer flask in Figure 2 contains a pre-weighed strip of magnesium metal, while the syringe mounted on top of the stopper contains a solution of HCl. When the HCl is added to the flask, the reaction between the acid and the metal will immediately start forming bubbles, and the amount of H2 gas being formed will be indirectly measured by the gas pressure sensor (also connected to the rubber stopper). You will conduct three trials using magnesium, then calculate an average value of the molar volume using all three trials.
The second part of this experiment is very similar to the first. The setup is exactly the same as for part 1, except you will be using an unknown metal sample of your choosing. By reacting the unknown metal with HCl, you will be able to determine the amount of H2 gas formed during the reaction, just as in Part 1. From there, you will be able to use stoichiometry to back-calculate the moles of the unknown metal, which you can use to determine the molar mass and identity of the unknown metal.
Safety and Waste Disposal
Appropriate lab attire, chemical splash goggles, and nitrile gloves are required for this experiment.
Hydrochloric Acid is a strong acid and is a corrosion agent that will cause severe eye irritation and damage upon contact. Inhaling the solution vapors may lead to respiratory irritation and should be avoided. The acid solutions you will be using in this lab are quite concentrated (1 M and 6 M), so extra care should be taken while handling the solutions. Should you get any acid on your skin, alert your TA immediately and rinse the affected area under running water for at least 15 minutes. Click here to see the SDS.
All waste in the Erlenmeyer flasks should be disposed of in the proper inorganic waste container in the fume hood. The syringes used to transfer the acid solutions should be rinsed with water before being put away. The water rinses should be disposed of in the inorganic waste container in the fume hood. The water from the water baths may be disposed of down the sink.
Experimental Procedure
Part 1: Determining the Molar Volume of a Gas
Before beginning, make sure you put on your nitrile gloves! The first thing you need to do is determine the “effective volume” of a 125 mL Erlenmeyer flask. To do this, get a 125 mL flask that is clean and completely dry and record its mass using a top-loading balance. Once you’ve recorded the mass, fill the flask with distilled water all the way to the top of the neck. Then, over the sink, you should insert the rubber stopper you will be using during the experiment (at least two holes should be present in the stopper). Water will spill out of the flask, so be careful to not spill water on the floor! At this point, the water in the flask should be filled all the way to the bottom of the stopper. If so, completely dry the outside of the flask and carefully remove the stopper without spilling any more water. Record the mass of the filled flask using a top-loading balance. By subtracting the mass of the empty flask from the mass of the filled flask, the mass of the water in the flask is obtained. From there, it’s very simple to figure out the volume of water in the flask.
Tips and Tricks: This part of the experiment may seem weird to you, so let’s consider why we did this. By subtracting the mass of the empty flask from the mass of the filled flask, we are left with the mass of water in the flask. We know that the mass of distilled water is 1.00 g/mL, so whatever mass of water you obtained is effectively the volume of water inside the flask. This is important because we need to know how much space the hydrogen gas will occupy as it is produced in the following reactions. Since the system is considered sealed when the rubber stopper is inserted, the effective volume of the flask does not change between trials, so you only need to do this procedure once!
Next, you should get a strip of magnesium and prepare it for the reaction. You’ll likely notice that the magnesium has an uneven black coating on it: this is magnesium oxide. Using a small piece of sandpaper, gently remove the oxide layer until the strip is silver and shiny. Be careful! Do not sand directly on the tabletop as this will ruin the tables! Once the oxide layer is removed, weigh the magnesium strip on the analytical balance. The strip should be between 0.0100 g and 0.0150 g, so you may need to cut the strip using scissors. Once you have a strip that is the proper size, put the strip into the flask whose volume you previously determined and insert the rubber stopper.
Now you should prepare your experimental setup as shown in Figure 2. The water bath should be prepared in a beaker that is large enough for the 125 mL Erlenmeyer flask to fit into, and the water level should be deep enough to cover the gas level in the flask (up to the bottom of the stopper). Next, connect a Gas Pressure Sensor to Channel 1 of the Vernier computer interface, connect a Temperature Probe to Channel 2, and then connect the interface to the computer using the proper cable. In the Logger Pro software on the computer, open the file “05 Molar Volume” from the “Advanced Chemistry with Vernier” folder. At this point, you should see two boxes on the screen: one for a pressure reading and the other for a temperature reading.
The other side of the Gas Pressure sensor has a plastic piece that comes to a point. This piece should be inserted into one of the two holes in the stopper and secured by twisting around 180°. The other hole in the stopper should be plugged with a plastic stopcock that is threaded on one end. This is where the syringe will be attached to add the hydrochloric acid. You may notice that some stoppers appear to have three holes in the top, but be careful! Only two holes in each stopper will go all the way through the stopper, so be sure you’ve attached the pressure sensor and stopcock to the appropriate openings!
Tips and Tricks: Once the flask is stoppered and the pressure sensor and stopcock are connected, you should conduct a leak test to ensure you have a sealed system. To do this, attach an empty syringe to the stopcock. Both the stopcock and syringe are threaded, so they should fit together nicely. Next, open the stopcock, draw up on the syringe to about the 5 mL mark (the actual value does not matter right now), and quickly close the stopcock. You should see that the pressure reading has decreased. If your system is sealed, the pressure should remain constant. If you see the pressure quickly return to the starting pressure, you will need to reassemble the flask ensuring that each piece (the stopper and the two inserts in the stopper) is put in properly and twisted to ensure a good seal. Repeat this procedure until the pressure remains constant after manipulation.
When you are certain that you have a sealed system, you should dispense about 20 mL of the 1.0 M HCl solution into a 50 mL beaker from the carboy in the fume hood. Remember that this is a concentrated acid! You must be VERY careful when handling it (see Safety and Waste Disposal section). Carefully draw up 5 mL of the acid into the syringe and attach the syringe to the stopcock. At this point, the Erlenmeyer flask should be in the water bath, the Gas Pressure sensor should still be connected to the stopper, and the Temperature Probe should be in the water bath but not actually touching the beaker. Now you are ready to conduct your first reaction!
On the Logger Pro software, click the start button along the top toolbar. You should start to see two plots start to form — one for pressure and another for temperature. After about 20 seconds, open the stopcock and depress the plunger of the syringe to dispense the HCl solution. Then quickly pull the plunger back to its original position and close the stopcock. As the HCl solution reacts with the magnesium strip, you should see bubbles forming in the flask accompanied by an increase in the pressure reading on Logger Pro. You should continue collecting data until all the magnesium has reacted and is no longer visible. If you still see bubbles or the pressure is still increasing, the reaction isn’t finished! The Logger Pro software will stop collecting data after 5 minutes, so be sure to extend the collection time if necessary. Alternatively, you may click the stop button if there are no more bubbles forming and the pressure has stopped increasing.
Once you have stopped collecting data, you may carefully remove the stopper from the Erlenmeyer flask to relieve the pressure in the system. It is important that you remove the stopper and that you do not open the stopcock. Remember that you added concentrated acid through the stopcock, so if you open it to relieve the pressure you may accidentally spray a small amount of HCl out of it. Dispose of the waste in the flask in the waste container in the fume hood, then clean and dry the flask. Record the change in pressure (ΔP) and the average temperature over the course of the reaction.
You may now repeat the procedure two more times with two new pieces of magnesium strips (each strip should weight 0.0100 g – 0.0150 g) and the 1.0 M HCl. Be sure to perform a leak test before adding the HCl in each trial.
Part 2: Determining the Identity of an Unknown Metal
After you’ve conducted all three trials of Part 1, you will be repeating the procedure using pieces of unknown metal. Obtain a sample of unknown metal from the fume hood and record the letter printed on the label. Record any observations you make about the unknown metal in your lab notebook – these observations may be useful later when you are figuring out the identity of your metal!
The procedure for Part 2 is identical to Part 1, so make sure you weigh between 0.0100 g and 0.0150 g of the metal for each trial. Take note that for Unknown 1, you should use the 1.0 M HCl like you did in Part 1. For Unknowns 2-4, you must use the 6.0 M HCl that is also located in the fume hood. Be sure you get the correct concentration for your unknown! From here, repeat the procedure from Part 1 (including the leak test after you’ve added the metal to the flask) for all three trials of your unknown metal. Record your observations during the reaction, and be sure to record the ΔP and average temperature for each of the trials.
References
(1) Laugier, A., Garai, J. Derivation of the Ideal Gas Law. J. Chem. Educ. 2007, 84, 11, 1832-1833
The amount of space taken up by one mole of gas. For an ideal gas, this value is 22.41 L/mol.
This type of balance does not have a cage around the stage and records mass to within 0.01 g.
This highly-precise and highly-sensitive balance has a cage around stage that prevents air currents from affecting the mass reading. Masses are recorded within 0.0001 g.
This is a test to ensure that a system cannot exchange gases with the surroundings. A sealed system should be able to maintain a reduced or increased pressure without quickly settling back to atmospheric pressure.